
You can use AI to build a job board. The useful question is what you want that board to do when a real employer posts a job and a real candidate tries to apply.
This guide walks through a niche board called Climate Roles. We'll choose a design system and technology stack, build the core journeys in stages, and work through deployment, security, and running costs. Each stage includes a prompt and a check you can perform before moving on. We'll also cover the additional work behind resume parsing, AI job matching, and email alerts, and where Cavuno fits if you want those systems supplied together.
Think of the result as a small job board product: employers have accounts and private drafts, an operator decides what goes live, and candidates can find and apply to current vacancies. Building those connections teaches you what to look for in a job board platform as well as how to make one yourself.
How to use this guide: Build and test the core through the employer-review stage first. Deployment is a separate launch milestone. The later prompts describe optional extensions—payments, alerts, profiles, matching, and integrations—so you can understand the next decisions without implementing them all. Finish with the cost and Cavuno comparisons.
Validation status: We built a local reference with Codex and tested fresh Clerk signup and sign-in, employer company creation, draft submission, rejection, editing, resubmission, approval, public browsing, external Apply, and closure. Ten automated backend tests and separate real-token permission checks passed. This was a supervised build with repairs, not a one-shot run of unchanged prompts. OAuth, production deployment, real email delivery, and the optional integrations below have not been validated.
For a custom frontend backed by Cavuno, use the separate TanStack Start + shadcn/ui starter kit. That template uses Cavuno's SDK and backend, so follow its own setup instructions rather than mixing it with this tutorial's stack.
Before you start
You will build the first version on your own computer, then put it online later. That is what running locally means. You do not need to know these tools already; here is what each one does.
| Tool | In plain English | Where to get it |
|---|---|---|
| Node.js | Lets your computer run the JavaScript software behind the website while you build it | Download Node.js; choose your operating system. Our tested reference uses version 22.23.2 |
| npm and npx | Tools supplied with Node.js: npm installs software packages and runs project commands; npx runs setup tools | Included with the standard Node.js installation |
| Next.js | The framework that organizes your website's pages and server code | The setup command below installs it; no separate account is needed |
| Git | Saves named checkpoints of your code so you can inspect changes or return to an earlier version | Install Git |
| AI coding tool | The app you ask to write, explain, and repair the code | Choose one in the next section; for example, Cursor |
| Convex | Stores your jobs and companies and runs the rules for reading and changing them | Create a Convex account |
| Clerk | Handles creating accounts and signing people in | Create a Clerk account |
A terminal is a window where you type commands instead of clicking buttons. On a Mac, open Terminal; on Windows, open PowerShell. Your coding editor may also have a Terminal menu. In this guide, code blocks marked as shell commands go there; prompts written as instructions go into your AI coding tool's chat.
Create development projects in Convex and Clerk for this tutorial. “Development” means a test setup for fictional jobs and accounts. “Production” is the separate setup you will eventually use for real visitors. You can leave hosting and buying a domain until the deployment stage.
You will still need to follow setup screens and check the app yourself. When an instruction is unfamiliar, ask your coding tool to explain it before running it. The local core does not need a payment provider, resume service, geocoder, or separate email-alert service. Keep test and production credentials separate. The stack table below shows where charges can begin; buying every paid plan upfront is unnecessary.
Decide what your first job board needs to do
Start with a narrow promise: help people find current climate technology jobs and apply on the employer's website.
The first version needs six things:
- A public list of current jobs.
- A page for each job, with a working application link.
- Search and filters for finding relevant roles.
- An employer account for submitting and managing jobs.
- An operator screen for reviewing submissions and closing listings.
- A deployed website with a domain and HTTPS.
Candidates can browse and apply without an account. Native applications, resume uploads, matching, and payments come later. That gives you a useful first milestone without asking the AI to implement every feature at once.
Start by sending this brief to your agent. Keep its plan in the conversation for now; after creating the project folder, ask it to save the agreed brief and decisions as PROJECT-BRIEF.md:
Read the proposed plan before implementation. Ask the agent to explain unresolved decisions and confirm the first-version scope in plain English. The following prompts assume you have agreed that plan; they should extend it rather than silently replace it.
Choose a niche you understand. The example is replaceable; the workflow is not. If you still need to decide who your board serves, use our broader guide to creating a job board.
Choose your AI building tool
Choose how you want to work before buying infrastructure.
| Approach | Examples | What to consider |
|---|---|---|
| Hosted AI app builder | Lovable, Replit | How the platform handles backend services, publishing, usage charges, and export |
| AI coding tool | Cursor, Claude Code, Codex | How you will run the project, connect services, deploy it, and review changes |
| Job board platform with an AI builder | Cavuno | Whether the supplied workflows and customization options fit your board |
Lovable documents a full-stack workflow including backend, authentication, hosting, and Git sync. Replit supports building and publishing apps. Give those bundled capabilities credit when comparing costs. A hosted builder does not necessarily need a separate hosting subscription and a separately purchased database.
Cursor is a candidate when you want to work directly with your repository. For this walkthrough, use that repository-based approach and one consistent stack. You can adapt the product prompts to a hosted builder, but its setup screens and implementation choices will differ. Ask it to explain its supported stack before specifying services.
Bolt and v0 are also worth investigating if you already use them. Avoid switching tools whenever you hit an error: preserving context and learning to describe a failure will usually help more than restarting the project.
Pick a technology stack and a design system
For the reference approach, use:
| Part | Choice | Purpose | Cost to budget (USD) |
|---|---|---|---|
| Website | Next.js with TypeScript | Public pages and employer/operator screens | $0 software license; hosting is separate |
| Styling and components | Tailwind CSS and shadcn/ui | Reusable controls, layouts, and styles | $0 for these open-source projects; paid design kits are optional |
| Backend | Convex | Records, backend functions, search, and scheduled work | Free within limits; Starter has a $0 base plus metered overages; Professional is $25/developer/month |
| Authentication | Clerk | Sign-in and identity connected to Convex | Hobby is free for up to 50,000 monthly retained users per app; paid features and overages can add charges |
| Hosting | Vercel | Deploying the website | Pro starts at $20/month for one developer, with included usage credit; Hobby is for personal, non-commercial use |
| Email, when added | Resend | Job alerts and application-sent confirmations | Transactional Free: 3,000 emails/month, capped at 100/day; Pro: $20/month for 50,000, plus overages |
Prices and allowances checked September 7, 2026. They exclude tax, domain registration, your AI coding tool, and additional usage. Authentication emails in the core are handled by Clerk; Resend is for the later app-email extension. The free software rows cover the selected open-source packages, not paid Tailwind or design-system products.
A lean starting budget: $0 in incremental hosting/backend/authentication subscriptions for local development within free allowances. For a small commercial launch on this Vercel-based stack, budget $20/month while Convex and Clerk remain within their applicable free limits. Adding Convex Professional makes that $45/month for one developer; adding Resend Pro makes it $65/month, assuming Clerk stays free. These are separate scenarios, not required upgrades, and exclude the additional costs above. Vercel's Hobby rules matter when turning a personal prototype into a commercial board.
Watch usage as well as account counts. Convex meters backend resources, Clerk measures retained users rather than job board visits, hosting meters requests and compute, and email has daily as well as monthly limits. For example, 1,000 subscribers receiving a daily digest could require about 30,000 emails in a 30-day month, before confirmations or other messages. Subscriber capacity and email-send capacity are different things.
This is a coherent choice for the tutorial, not a requirement for every board. If you know another stack, familiarity may matter more than a small difference in subscription price.
Choose components before designing every page
shadcn/ui gives you editable component code, making it a useful foundation when working with an AI coding tool. Untitled UI is an alternative with React components, application examples, and design resources. Check that the assets you choose are included in your license; a Figma kit and a React implementation are different deliverables.
Choose one system. Define your type sizes, colors, spacing, borders, and content width once, then reuse them. Your job cards, forms, filters, and dashboards should look like parts of the same product.
Choose the visual direction now. Implement the component prompt below after the project and shadcn/ui are installed.
Follow one stage at a time
Keep using the same project as you build. Give the agent one stage's prompt, let it finish, then use the check before moving on. Ask it to keep PROJECT-BRIEF.md current and maintain BUILD-LOG.md with completed stages, tested results, unresolved failures, and the next step. If you start a new conversation or the agent loses track, have it read both files and inspect the existing project before changing anything.
| Stage | Your agent does | You do | You can move on when |
|---|---|---|---|
| Setup | Checks tools, creates the project, runs the website | Sign into services or complete installation steps it cannot handle | The starter page opens in your browser |
| Accounts | Connects Clerk to Convex and adds sign-in pages | Create a development user and sign in/out | A backend identity check changes with your session |
| Design and records | Builds reusable screens, stores companies/jobs, adds fictional examples | Review the layout and open a job directly | The same job survives a page refresh |
| Discovery | Adds search, filters, pagination, and Apply | Try matching and empty searches, then follow an application link | Results and links behave as expected |
| Employer and operator | Adds submission, review, and account permissions | Use separate test accounts to submit, reject, correct, approve, and close | The full core journey table passes |
| Launch | Prepares hosting, production settings, and recovery steps | Choose billing/domain settings and test the deployed site | The separate production launch checklist passes |
If a check fails, stop at that stage. Send the agent the page address, what you clicked, what you expected, and what happened. Let it investigate and rerun the check. An agent saying “done” is not the checkpoint—the working experience is.
Set up the project and save a working checkpoint
Let your coding agent handle the setup
If your coding tool can edit files and run terminal commands, give it the setup work. It can check installed software, create the project, install packages, start the website, and investigate errors. The manual instructions below explain what it is doing and give you a fallback when a tool cannot perform a step.
Open your coding agent in a folder where you want to keep the project, then send:
Capabilities vary: an agent with terminal access can usually do much more than a chat-only assistant. You may still need to sign into accounts, complete verification, authorize an installation, or select billing. You remain responsible for checking the finished experience, but you do not need to type every command yourself.
Manual fallback: install the tools and check they work
If your agent has already completed a step, check its result and skip that step here. Otherwise, install Node.js and Git using the links above, then open a new terminal window. Run each command separately by pasting it and pressing Enter:
Each should print a version number. If you see “command not found” or “not recognized,” the tool is not available in that terminal yet. Finish installing it and reopen the terminal before continuing. Our tested setup used Node.js 22.23.2; choose that version on the download page to match the reference. Later versions may require different setup steps.
Manual fallback: create the website on your computer
Choose a folder where you keep projects and open a terminal there. In an editor such as Cursor, open that folder and use its terminal. Then run:
This downloads the Next.js setup tool and creates a new folder called climate-roles containing your starter website. If npm asks to install the setup package, confirm the package name and continue. Wait until setup finishes and you can type another command.
The options already choose TypeScript (JavaScript with extra checks), Tailwind CSS (styling), App Router (how Next.js organizes pages), and ESLint (a code checker). You do not need to choose those settings yourself.
Next, move the terminal into your new project folder:
cd means “change directory.” Commands from now on run inside this project. Open the same climate-roles folder in your coding editor so the AI can work on its files.
Start the website:
The terminal prints a local address, usually http://localhost:3000. Open the address it actually shows in your browser. You should see the Next.js starter page. “Localhost” means your own computer; this is not yet a public website. Leave this terminal running while you use the app. Press Ctrl+C when you want to stop it.
Check: Do not add accounts or job features until that starter page loads. If it fails, copy the error message into your coding tool and ask it to fix the setup before continuing.
Our local run used Node.js 22.23.2, Next.js 16.3.4, React 19.2.8, Convex 1.45.0, and Clerk Next.js 7.9.1. These are the versions we tested, not a promise that they will always be the best versions to install. Review updates before launching. Keep package-lock.json, the generated file recording installed package versions, so subsequent installations can reproduce them. Ask your coding tool to read the project's framework instructions and installed-version documentation. Framework APIs change; an example remembered by a model can be out of date.
Connect the database and sign-in service
Ask your agent to do this connection work first. If it already installed the dependencies, do not repeat their installation. For the manual fallback, keep the website terminal running and open a second terminal in the same climate-roles folder. Run the following commands one line at a time. The first installs the Convex and Clerk libraries; the next two install the shared interface components; the last connects your backend and keeps it running:
Follow the Convex login prompts, sign in to your Convex account, and create a new development project for Climate Roles. In another browser tab, open the Clerk dashboard and create a development application for Climate Roles. Use the current Convex and Clerk integration guide and Clerk Next.js quickstart to connect identity to the backend. The commands above install shadcn/ui before any prompt refers to its components. Our run selected its Base UI foundation; do not assume older Radix component APIs apply.
An environment variable is a named setting, such as the address of your database. Some settings are secret keys. The file .env.local stores settings for the website on your computer; it belongs in the project folder and must not be committed to Git. Your AI can create the file structure and explain where to copy each value without asking you to paste secrets into chat.
The setup has two places for configuration:
| Location | Configuration |
|---|---|
| Website's local environment | Generated Convex URL, Clerk publishable key, and Clerk server secret |
| Convex development environment | Clerk issuer configuration and any credentials used by backend actions |
The following checklist is for you and your coding tool together. You handle account setup and copying credentials in the dashboards; ask the AI to make the code changes using the connection prompt below. Authentication simply means proving who has signed in.
The issuer is the Clerk service that vouches for a signed-in user. Providers are code components that make sign-in and database access available to the rest of the website. Your agent handles those code details.
Connect authentication in this order:
- Create a Clerk development application and enable the sign-in methods you intend to test.
- Copy its publishable and secret keys into
.env.localasNEXT_PUBLIC_CLERK_PUBLISHABLE_KEYandCLERK_SECRET_KEY. Keep that file ignored by Git. - Activate the Convex integration in Clerk. Copy the Clerk Frontend API URL; this is the token issuer, not your Next.js website URL.
- Configure that issuer in
convex/auth.config.tswithapplicationID: "convex". If you useprocess.env.CLERK_JWT_ISSUER_DOMAIN, set it in the Convex development environment. A value in Next.js's.env.localalone does not configure the deployed backend. - Wrap the application with ClerkProvider and ConvexProviderWithClerk, passing Clerk's
useAuthhook to the latter. Use Convex's authenticated state before calling protected queries. - Add
/sign-inand/sign-uproutes. For this Next.js version, configure Clerk middleware inproxy.ts, following the current quickstart's matcher. - Restart the local website after adding keys. Sign in and call the authenticated backend check below.
For an isolated local experiment, we used CONVEX_AGENT_MODE=anonymous npx convex dev and a fresh accountless Clerk development app created with npx clerk@latest init --accountless --no-skills --yes. That avoids reusing an existing application's data. It is a local test route, not a production deployment. Clerk still needs its Convex token configuration. Use the cloud setup above for a hosted board.
Public connection identifiers are different from secret keys. Keep secrets out of browser code, screenshots, and version control. When email is added, place its API key in the environment where the sending code runs.
Check: Open the identity-check URL your agent provides, sign in, and see “Backend recognizes your account.” Sign out and confirm it changes to “Sign in to check.” Ask the agent to verify separately that the backend rejects a signed-out request. Then ask it to save a Git checkpoint—a named snapshot of the working code—without including secret files.
Save a checkpoint you can return to
At each working stage, ask the agent:
Check: The agent should give you a commit ID—the identifier of the saved snapshot—and confirm what it includes. A folder existing on disk is not the same as a Git checkpoint. If Git needs your name/email configured, have the agent explain that step and choose the identity you want attached to commits.
Build the shared components
Check: Open the component-preview URL the agent provides. Resize the page to a phone width. Tab through its controls. Try a long job title and a missing salary. Make sure the application button and form labels remain clear.
Create the job records and public pages
A record is one saved item, such as a job or company. A field is one fact about it, such as its title. Define these before the agent builds search so filtering has reliable data to use.
| Record | Important fields |
|---|---|
| Company | Name and verified owner for the core; website, description, and logo can be added later |
| Company ownership in v1 | Verified identity owns one company; no team invitations yet |
| Job | Company, owner, title, description, application URL, status, publication and expiry dates |
| Job filters | Employment type, work arrangement, one eligible location; optional annual USD salary range |
“Remote” describes a work arrangement. “Must be based in Australia” describes eligibility. Store them separately. A salary of 100,000 is incomplete without currency and a pay period.
Check: Open a job's URL directly, refresh it, and open it in a private window. The same public record should appear. The agent should test private-draft and expired-job visibility with backend fixtures now; you will exercise their management screens after the employer stage is built. Expired fixtures must not offer an active Apply action.
Add search, filters, and application links
Start with keyword search and structured filters. You do not need a separate vector database to make the first version useful.
Check: Combine two filters, copy the URL, and open it in another browser. Try an impossible combination and clear it. Confirm every result is current and every application link goes to the intended employer page.
When keyword search misses useful roles, collect examples before adding semantic search. “Battery engineer” and “energy storage engineer” might be a good test pair. Convex includes vector search; Qdrant is an optional dedicated service. Choose based on the search you need rather than adding another bill automatically.
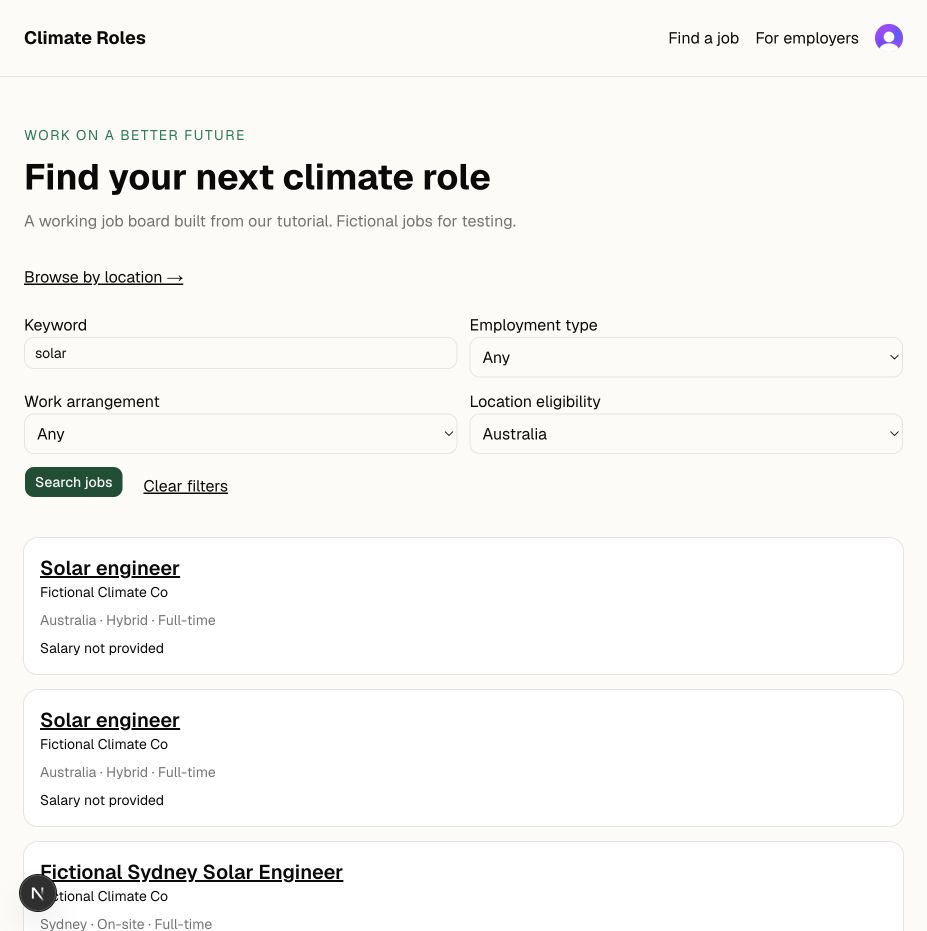
The actual local reference: keyword and location filters working together. Listings are fictional.
Let employers submit jobs and operators review them
Build the management screens while the application is still small. You will need them to correct a salary, reject spam, close a role, or help an employer who made a mistake.
Check: After the operator setup below, use three separate development identities: Employer A, Employer B, and the operator. Submit as A, approve as the operator, and view the public listing. B must not see A's private drafts or edit A's jobs. Ask the agent to test direct backend requests with B's identity too; hiding a button is insufficient. Use separate browser profiles or sign out before switching accounts so you know which identity is active.
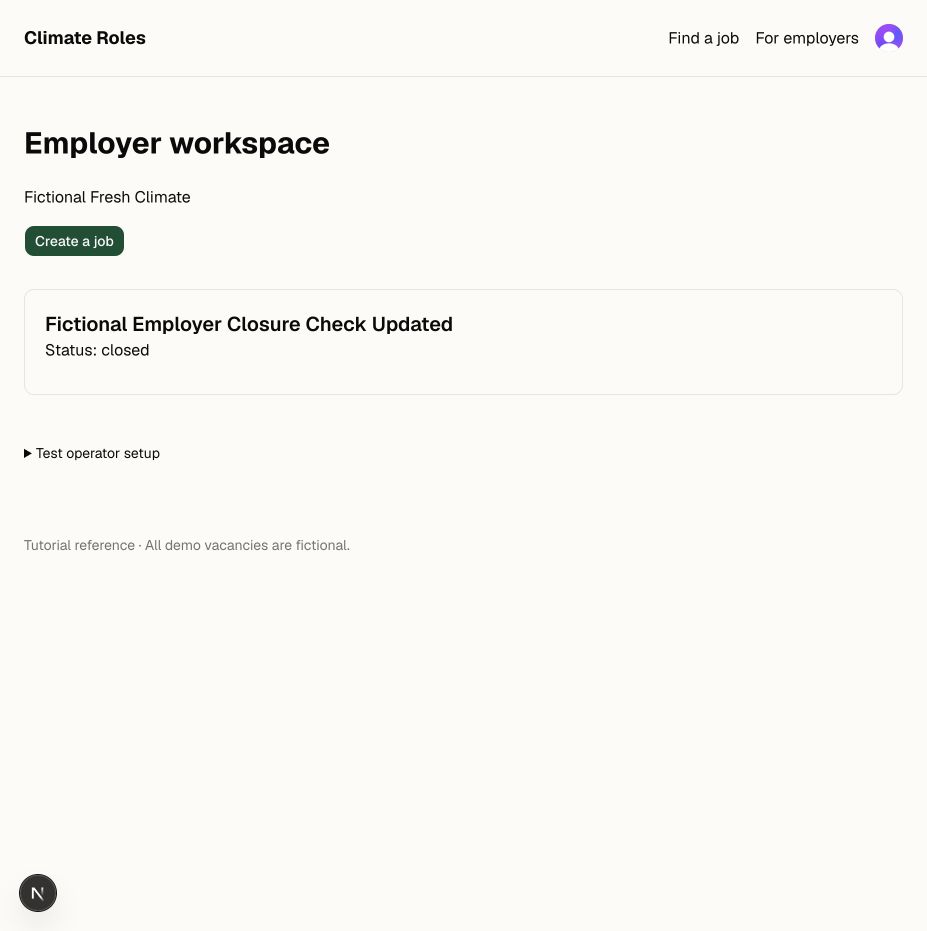
The employer sees its own listing state. A closed job no longer offers edit or submission actions in this reference.
Bootstrap and test the operator deliberately
The operator is the person running the board and reviewing submissions. Use a dedicated development account for that role; do not promote Employer A or B.
Keep operator assignment in an internal Convex function, such as jobs:bootstrapOperator, with no public button or mutation that grants roles. Ask your agent to retrieve the operator's exact verified identity through its authenticated backend check or trusted development tools, rather than asking you to invent an identifier. Ask your agent to run the internal setup only after you identify the intended operator account and development project. If doing it yourself, the command is:
This command assumes your implementation uses that function name and argument. Inspect its code before running it, and select the intended development deployment. Do not guess an email address or copy a user-controlled form value into an operator record. The reference implementation stores the issuer-qualified token identifier.
Use two separate development users to test ownership. Clerk documents reserved test email addresses and verification codes, so you can test email-code sign-in without sending real emails. This does not test real email delivery or OAuth.
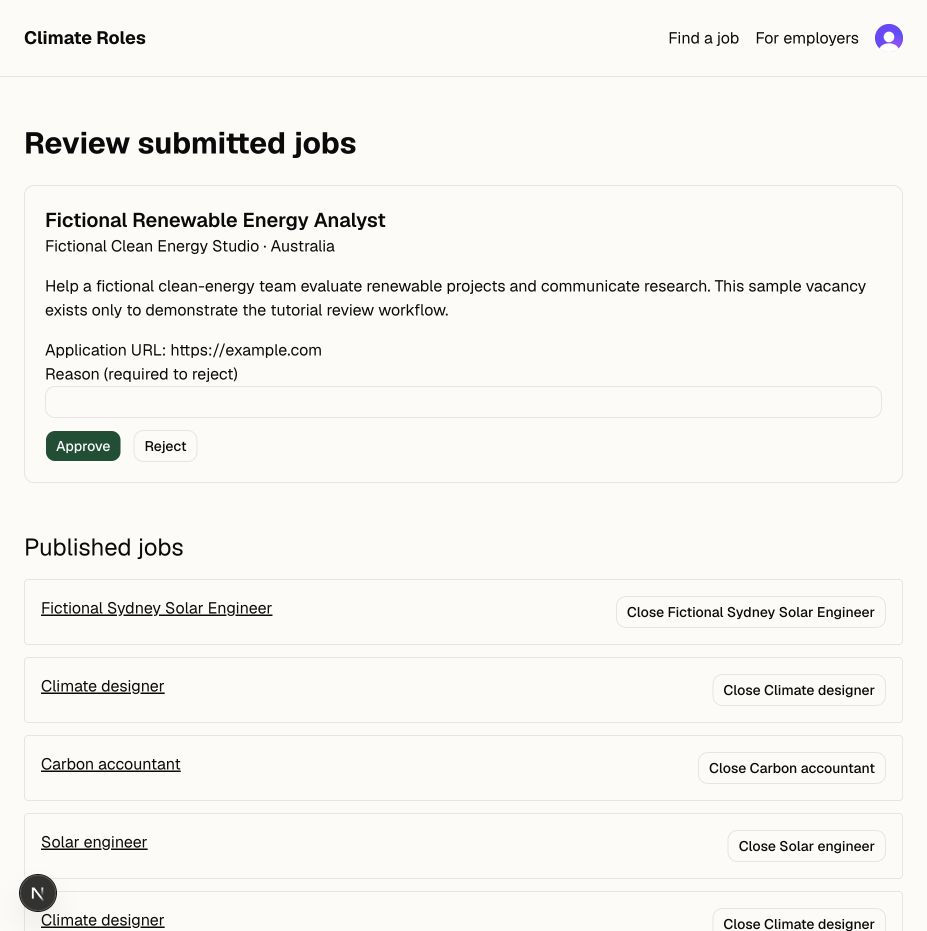
The actual review screen: a submission stays pending until the operator approves or rejects it. This screenshot uses a fictional fixture, not customer data.
Fix what the browser exposes
Our first pass produced a form that looked complete but did nothing: its component button defaulted to type="button". Explicit type="submit" fixed the form. A fresh reload was needed to verify the updated DOM in our run. We also replaced raw backend error details with a readable salary-validation message.
A later regression check exposed a subtler problem: including a changing expiry timestamp in the database's pagination filter invalidated its next-page cursor. The reference now paginates the stable query, then removes overdue records on the backend before returning that page. A page can consequently contain fewer visible jobs; the UI must still allow continuation when the cursor says more records remain. A test advances time between page requests to catch this regression.
The application link also goes through a server route that rechecks whether the job is still public before redirecting. This matters when someone leaves a job page open while an operator closes the vacancy.
Use a repair prompt that names the evidence:
For automated backend checks in this reference stack, our run used Vitest 5, convex-test, and an edge runtime. The starter's Node 20 type definitions conflicted with the current test runner; matching them to our Node 22 runtime resolved the install. Avoid --force as a substitute for resolving the dependency mismatch.
These commands only verify tests your project actually contains. Require tests for another employer's read/write attempts, ordinary-user moderation attempts, repeated submission, rejected-job editing, unsafe URLs, reversed salary ranges, and expired public reads. Use fake timers and advance the test clock through expiry before running scheduled work; a test that directly calls the cleanup function does not prove the scheduler ran correctly. Add a separate test showing public reads exclude an overdue job before cleanup runs.
Check the complete core journey
At this point, you should have a small working job board system. Test it as three different people: a candidate browsing publicly, an employer managing their company, and an operator reviewing submissions. Keep a second ordinary employer account for the access checks.
| Journey | What you should observe | Reference evidence |
|---|---|---|
| New employer | Sign up, verify, create a company, and reach the workspace | Passed with a fresh development account through the real Clerk UI |
| Returning employer | Sign in and see the same company and owned listings | Passed with separate employer and operator accounts |
| Submission and feedback | Save → submit → operator rejects with a reason → employer edits → resubmits | Passed through the browser |
| Publication | Operator approves → listing appears publicly → candidate opens it and follows Apply | Passed; external Apply reached the fictional destination |
| Finding work | Search, combine filters, reload the URL, clear filters, and load more | Passed, including empty results and phone-width/keyboard use |
| Closing a vacancy | Close → public detail becomes unavailable and no longer offers Apply | Passed through operator closure and employer withdrawal of a pending job; expiry also has backend tests |
| Account boundaries | Another employer cannot read private drafts or change the owner's jobs; an ordinary user cannot moderate | Passed with real authentication tokens and separate backend tests |
The location example also connects Australia → New South Wales → Sydney and carries a regional browse page into filtered search. It demonstrates how data and navigation connect; it uses a small curated registry rather than worldwide address lookup.
Our reference took follow-up repairs to reach this checkpoint. The prompts supplied useful direction, but they did not remove the need to inspect generated code and use the app. Google OAuth, real email delivery, and hosted deployment remain untested. A direct saved Apply URL after closure was also blocked by our browser tooling, so we do not count that browser path as verified; the closed-detail and backend visibility checks passed separately.
Decide what you want to build next
Once those checks pass, you have the core of a useful board. You have also seen the work behind accounts, private drafts, review decisions, search, and expiry. Before adding features, decide whether maintaining those systems is part of the project you want to own.
| What you want next | A practical route |
|---|---|
| Learn more or build unusual workflows | Keep developing this project with your agent; choose one extension and test it |
| Launch and focus on employers, candidates, and growing your niche | Explore Cavuno and try the same submission, review, and discovery journeys |
| Design your own frontend while using Cavuno's backend | Start from the Cavuno TanStack/shadcn kit and follow its separate setup guide |
The work you have done gives you a better specification whichever route you choose. Moving to Cavuno does not automatically import this prototype's code or database; carry over your requirements, design preferences, and any data through the supported import paths.
If you continue independently, you can stop feature development here and prepare a launch. The later sections explain the additional workflows so you can choose what your niche actually needs.
Deploy your first working version
This stage puts your website on the internet. A repository is your saved code project; a service such as GitHub can hold a private copy online. Ask your agent to prepare that repository and walk you through connecting it to Vercel. You handle sign-in and any paid-plan choices. Create production instances for the backend and authentication service, configure the corresponding production values, and follow the providers' current deployment instructions. A development database should not quietly become your production database.
Connect your domain using the DNS records supplied by the host. Check HTTPS, sign-in, and public job URLs on that domain.
Public job pages also need accurate titles, canonical URLs, sitemaps, and job structured data. Put JobPosting markup on individual eligible job pages and keep it consistent with visible content. Follow Google's job-posting requirements, including handling expired roles. Valid markup makes a job eligible for the feature; it does not guarantee inclusion or rankings.
For the wider launch plan, use our job board SEO guide to connect technical setup with keyword research and useful content.
Launch check: In a fresh browser, browse → filter → open job → apply. Then sign in as an employer → submit → approve as operator → find the published job. Replace fictional listings with real jobs you are entitled to publish. Recheck the application destinations.
Checkpoint: Only call this a launched board after completing the deployment and browser checks above. Our reference run validates the local core, not hosted production. The following sections are extension specifications; their integrations have not been built or tested in this reference run.
Decide whether you are ready for real users
Completing the local tutorial is one milestone. Before inviting employers or collecting candidate data, record evidence for each launch condition:
- The production domain has HTTPS, and signup, sign-in, sign-out, and account recovery work with production configuration.
- An employer can submit, receive a review outcome, correct a rejection, and find the approved job publicly; another employer cannot access private records.
- Search, mobile navigation, and application links work on the deployed site; closed and expired jobs lose their active application path.
- Fictional fixtures are removed, real listings are authorized and accurate, and indexing settings, canonical URLs, sitemaps, and job markup match real inventory.
- Someone receives operational errors, knows how to roll back, and has demonstrated a restore in an isolated environment.
- If you add payments, alerts, or resumes, their own payment-failure, unsubscribe, delivery, private-access, and deletion checks have passed first.
Keep unfinished items visible and limit access accordingly. Our local test build has not passed this production launch gate.
Add paid job postings
Use our job board monetization guide to choose an offer that fits your stage. Decide what an employer buys before connecting payments. For example: one reviewed listing, active for 30 days after publication. Explain what happens if a paid submission is rejected.
Check: Test a successful purchase, cancellation, and duplicate delivery of the same event. Confirm the posting is granted once and a cancelled checkout grants nothing. Use the payment provider's test tools before switching to live mode.
Add job alerts people can unsubscribe from
A job alert has several parts: a saved preference, a confirmed email address, a schedule, matching jobs, delivery, and an unsubscribe route. Our email marketing guide for job boards explains how alerts fit alongside newsletters and employer communication.
Set up a sender domain in Resend, add its requested DNS records, and confirm verification. Sending successfully through an API does not prove delivery to an inbox.
Check: Subscribe with an address you control, confirm it, publish a matching job, and trigger a test digest. Check the actual inbox and links. Unsubscribe and confirm the next run excludes you. Handle failures without incorrectly advancing the successful-delivery checkpoint.
Turn resumes into editable candidate profiles
Resume parsing can save candidates from retyping work experience. It also introduces private files, extraction failures, model usage, and information that needs correction.
Begin with a clearly documented set of supported files. A text PDF, an image-only scan, and a DOCX need different handling. Tell candidates what you support rather than accepting files you cannot process.
Check: Try a clean sample, missing dates, unusual formatting, and an unsupported scan. Correct a parsed value and reload the profile. Use a second account to verify the resume and private profile are inaccessible.
The recurring cost includes storage and extraction/model usage. The development work includes the review screen, permissions, failure handling, and deletion behavior.
Match candidates with relevant jobs
Search answers a query. Personalized matching uses the candidate's profile and preferences to suggest jobs. Those are different experiences.
Start with explicit constraints such as location eligibility and employment type, then rank eligible jobs by relevant experience and skills. Do not let a similar-sounding title override a candidate's stated location requirements.
Check: Give one candidate a strict location preference and include an otherwise similar but ineligible job. Confirm it is excluded. Close a recommended job and check that it disappears. Compare the results with your own judgment before assuming the system is useful.
Emailing personalized matches is another opt-in workflow. Keep it distinct from a saved-search alert. These recommendations help candidates explore roles; they should not silently become automated rejection decisions for employers.
Add analytics and a source of fresh jobs
Track the events that tell you whether the board is useful: job views, searches, apply clicks, employer submissions, and completed purchases. Define them before building dashboards.
An external apply click tells you someone left for the employer's application page. It does not tell you whether they finished applying. Avoid collecting resume text or private profile fields in analytics events.
Tinybird is one option for building analytical queries and reports. You may initially need a smaller setup. An employer report showing views and apply clicks still requires event collection and an interface, whichever database stores the events.
Start sourcing jobs through manual entry or CSV import. Add permitted recurring feeds when manual maintenance becomes a burden. Imports need stable source identifiers, duplicate handling, validation, and a policy for closing jobs that disappear. A feed that runs successfully can still fill your board with stale listings.
For a deeper sourcing plan, see our job board aggregator guide.
Connect the board to your other tools
A useful board also fits into your workflow: a published job can start a social-posting workflow, a CRM record can become a draft vacancy, and a withdrawn marketing permission can update your email tool. Choose one concrete workflow before asking an AI to “add integrations.”
For a custom board, that usually means an authenticated API and outbound webhooks. You own permission checks, event definitions, signing, retries, duplicate delivery, logs, and credential revocation. Zapier and n8n can orchestrate the steps, but they still need a reliable way to read and change your board.
This is an optional extension specification; it has not been implemented or tested in our local test build.
Check: Publish a fictional job, observe its delivery record, simulate a receiver failure, and confirm eventual delivery produces one downstream action. Revoking the integration must stop future authorized access. A successful HTTP request alone does not prove this journey works.
Keep the board secure and operating
Security starts with permissions and data handling during the build. Operating the board means preserving those protections as you change it.
Configure traffic protection without overlooking the app
Cloudflare provides DDoS protection and related traffic-security products. Check what your hosting provider already supplies before adding another service. DNS, proxying, firewall rules, and application controls have different jobs.
Map which requests pass through your configured protection. A protected website domain does not automatically cover every directly reachable backend endpoint. Add limits to expensive or abusable actions such as resume parsing, matching, uploads, subscriptions, and signups.
Maintain a practical operating checklist
| Responsibility | What to verify |
|---|---|
| Account access | Operator access is protected; recovery works; removed team members lose access |
| Authorization | Employer and candidate ownership checks still hold after changes |
| Private data | Files require authorized access; logs exclude sensitive contents; deletion works as described |
| Secrets | Keys stay server-side; development and live values are separate; exposed credentials can be rotated |
| Inputs | Descriptions render safely; URLs and uploads are validated; AI treats documents as data |
| Dependencies | Security updates are reviewed and important journeys rerun after upgrades |
| Backups | A backup can actually be restored in an isolated environment |
| Monitoring | Failed imports, email runs, payments, and unusual usage reach someone who can respond |
Test request limits with a small, controlled set of requests to your own test environment. You do not need to simulate a DDoS attack.
At this point, compare the recurring work with the time you want to spend on the business. If you would rather focus on attracting employers and helping candidates, Cavuno's plans are worth evaluating against this checklist. If you enjoy owning the software, keep these checks with your project and rerun the affected journeys as it changes.
Know what to do when the AI breaks something
Save a working checkpoint after each stage. When something fails, describe the route, account, action, expected result, and actual result. Include the error message with sensitive data removed.
A small employer request becomes a maintenance decision
An employer writes: “The salary on our published job is wrong. Can you change it?” In this reference, approved jobs cannot be edited in place. The supported path is to close the listing and submit a corrected replacement for review. That is a deliberate first-version limitation, but it also means a new URL and another review cycle.
If your niche needs edits without that disruption, specify a revision workflow before changing the form:
This extension has not been built in the reference. It illustrates why maintenance includes product decisions, permissions, data changes, and regression checks. When evaluating Cavuno or another platform, try its supported editing workflow against the same employer request.
Compare the costs fairly
Separate building costs, running costs, and your time. A coding subscription used across several projects is different from API usage generated every time someone uploads a resume.
Here are illustrative vendor prices checked on September 7, 2026, in USD. They are not a minimum required stack or a measured bill for this tutorial.
| Service | Published example | How to interpret it |
|---|---|---|
| Vercel | Pro: $20/month for one developer seat, with included usage credit | Account for usage and included hosting protections |
| Convex | Professional: $25/developer/month | Free and usage-based options also exist; it includes search capabilities |
| Resend | Pro: $20/month for 50,000 transactional emails | Free tier has monthly and daily limits; marketing email is priced separately |
| Tinybird | Developer: $49/month | Optional; a free tier also exists |
| Qdrant | Free prototype tier; paid resource-based service | Optional; do not duplicate search infrastructure without a reason |
| AI building tool | Codex via ChatGPT Plus $20/month; Claude Pro with Claude Code $20/month (US); Cursor Pro $20/month; Muse Code Everyday Usage $5/month, with higher plans and pay-as-you-go options | Choose one; see the sourced comparison below. Usage limits differ, and runtime model calls are separate |
| Runtime AI | Model calls, embeddings, and any document extraction service | Additional usage for parsing and matching; excluded from the subtotal |
| Place lookup and automation | Provider requests, Zapier tasks, or n8n hosting/plan | Optional extensions; include storage permissions, usage limits, and integration maintenance |
| Authentication, domain, design assets | Depends on selected service and license | Include applicable limits, renewals, and one-time purchases |
Budget for the coding agent you choose
These are alternative building tools, not subscriptions you need to buy together. Prices checked September 7, 2026, in USD before applicable taxes; availability and local pricing can vary.
| Coding tool | Published price example | What to account for |
|---|---|---|
| Codex | Included with ChatGPT Plus at $20/month; Pro starts at $100/month | Plan usage limits apply; extra credits and API-key billing are separate options |
| Claude Code | Included with Claude Pro at $20/month in the US | Subscription usage is limited; do not assume it includes API credit for your application |
| Cursor | Pro at $20/month; Hobby has limited free Agent requests | Higher tiers and usage-based features can increase the bill |
| Muse Code subscriptions | Everyday Usage $5/month; High Usage $15/month; Power Usage $50/month | Everyday includes 10–50 requests per five hours; higher plans offer 3× and 10× usage. Subscription access is for Muse Code, not general API credit; regional offers may vary |
| Muse Code via Meta Model API | Muse Spark 1.3 Standard: $1.25 per million input tokens and $4.25 per million output tokens | Pay-as-you-go; cached input is priced separately. Separate from the subscriptions above; check billing details before choosing |
| Muse Code Contributor option | $0.10 per million input tokens and $0.20 per million output tokens | Lower pricing permits Meta to use prompts and completions for model training; compare that condition as well as price |
Tokens are the units used to measure text sent to and generated by a model. As an arithmetic example, 10 million uncached input tokens plus 1 million output tokens would cost $16.75 at those Muse Standard rates, or $1.20 at Contributor rates, before other billable tools. That is not an estimate of the tokens needed to build this board, nor evidence that one agent is cheaper for the same completed task.
If you already pay for a coding subscription and have sufficient allowance, its incremental subscription cost for this project may be $0. If you buy a $20/month option for the build, the lean $20/month hosting scenario becomes $40/month during months you keep both subscriptions, before domains, tax, and overages. Your deployed board does not need that coding subscription to serve visitors; resume parsing and matching use separately billed runtime services.
Include both the coding tool and the services in your build-and-run budget. Choose one coding tool, then add the infrastructure scenario you actually need:
| Scenario | Services | With Muse Code Everyday ($5/month) | With one $20/month coding subscription |
|---|---|---|---|
| Lean commercial launch | Vercel Pro $20; Convex and Clerk within free allowances | $25/month | $40/month |
| Selected paid services | Vercel Pro $20 + Convex Professional $25 + Resend Pro $20 + Tinybird Developer $49 = $114 | $119/month | $134/month |
These combined totals apply while you keep the coding subscription. They exclude domain registration, tax, overages, separately billed runtime AI, and optional services outside the selected scenario. The lean scenario does not include paid app-email or analytics services. Coding-tool allowances differ; these totals do not imply equivalent capacity or capability.
The selected paid-services subtotal is $114/month for one developer, excluding authentication, runtime AI, and other services and overages. That combination is an illustration of assembling paid services; it is not the cheapest way to launch. A lean board may remain within several free allowances, but check commercial-use terms: Vercel describes Hobby as intended for personal, non-commercial use. A hosted AI builder may bundle services that this stack buys separately.
For a concrete platform comparison, Cavuno Starter currently costs $39/month billed monthly, or $348 billed annually ($29/month equivalent). The live pricing page checked on September 7, 2026 lists 500 active jobs, 1,000 email subscribers, hosting, a custom domain with SSL, job aggregation, resume parsing, and 50 AI website builder credits per month. Starter retains the Cavuno footer credit; a custom email domain and removing that credit require Basic or above.
The $119–$134 combined DIY examples and $39 Starter price are not a measured like-for-like savings claim. The DIY examples buy a coding subscription and selected paid infrastructure; Cavuno includes application workflows within plan limits. Compare your actual requirements and usage on each side. Domain registration, payment processing, external automation subscriptions, and your operating time may still apply.
Model your own workload: active jobs, visits, search requests, subscribers, emails per month, and resumes parsed. Then compare a Cavuno plan that covers the same capacity. Keep payment processing and domain costs visible on both sides where applicable.
For budgeting beyond software, our job board startup cost guide covers the wider launch budget. Use the dated prices in this tutorial for its specific stack and recheck providers before committing.
Also record hours spent building, troubleshooting, updating, and operating the board. Leave those as hours unless you choose an explicit hourly value. We have not measured the reference build yet, so we make no claim about how long it takes.
What Cavuno supplies beyond this tutorial
The tutorial walks you through a useful first board and shows the work involved in getting it right. The next comparison is whether you want to keep assembling and maintaining the features around it, or use a job board platform that supplies them together.
AI coding tools help you build the software. Cavuno supplies a job board system you can configure and customize. The useful comparison includes both the experience you just built and the workflows you expect to need next.
A connected set of search and location pages
Cavuno includes programmatic pages for locations, categories, skills, and supported combinations. Its geographic hierarchy connects country, state, and city navigation—for example, Australia → New South Wales → Sydney—rather than leaving each location page disconnected. The hierarchy also supplies the breadcrumb trail and structured data. Its location directory builds parent/child relationships from place records, so the internal links follow the geography.
That matters as your inventory grows. Adding a Sydney vacancy has implications beyond the job detail page: which city and regional searches should include it, where a candidate can discover it, which related pages should link to each other, and what happens when the vacancy closes. In a custom build, you own those relationships and their tests.
Cavuno also handles canonical URLs, supported alias redirects, metadata templates, sitemap generation, and page-indexing rules. These are tools for maintaining a useful, discoverable site; they do not guarantee Google will index every page or rank it. Review the landing-page documentation and technical SEO guidance.
For the underlying page strategy, read our programmatic SEO guide for job boards. If your niche is a city or region, the local SEO guide covers that more specific growth plan.
Location lookup is another part of the build
The feature you type into is usually called place autocomplete or address autocomplete. Geocoding resolves a location to coordinates and geographic context. A custom board can use Mapbox Geocoding or Google Places Autocomplete, among other providers. A map is optional; consistent location data is useful even when you never display one.
Cavuno's location-input code uses Mapbox place identifiers and geographic context, then normalizes submissions on the server. The wider board connects those place records to browsing and location pages. In your own build, selecting “Sydney” is only the beginning: you need to distinguish places with the same name, maintain country and regional relationships, and keep remote-work eligibility separate from an office address.
The reference uses a small curated location list. Replacing it with global lookup is an optional extension, not a feature already validated by this tutorial:
Check the chosen product's storage rules before designing the database. For example, Mapbox Geocoding distinguishes temporary results from permanent results, with different storage permissions. Do not assume every autocomplete product permits saving its full response indefinitely. Include lookup usage and the work of maintaining place data in your cost comparison.
The surrounding job board workflows
| Area | Cavuno capability | Work to account for in a custom build |
|---|---|---|
| Job supply | Job aggregation and imports, with reusable import mappings and listing-maintenance workflows | Source permissions, recurring fetches, normalization, duplicates, failed runs, and stale-job handling |
| Search and discovery | Hybrid search, location/category/skill pages, and connected browsing | Relevance, geographic identity, index updates, filtering, pagination, and internal links |
| Candidate profiles | Resume upload, parsing, and profile autofill | Private storage, extraction, candidate review, access controls, deletion, and parsing failures |
| Recommendations | Profile-based job matching where enabled | Eligibility rules, ranking quality, refreshes, empty profiles, and evaluation |
| Retention | Job alerts and subscriber-management workflows | Consent, verification, matching, schedules, unsubscribe, bounces, and delivery monitoring |
| Employer revenue | Configurable posting plans, bundles/subscriptions, featured jobs, memberships, and talent-access products | Checkout, entitlements, credits, renewal rules, refunds, webhooks, and employer reporting |
| Board-specific data | Custom job fields used across submission, editing, and job details | Consistent validation, forms, display, API behavior, and migrations |
| Branding and operations | Hosted board customization, domains, analytics, and administrative workflows | Deployment, domain configuration, dashboards, support tools, permissions, and maintenance |
Availability depends on the selected plan, board configuration, and connected services. For example, profile matching must be enabled, paid workflows need payment configuration, and automated sourcing depends on its sources. Compare the workflows and limits you will actually use; buying a platform does not eliminate niche selection, employer relationships, content quality, or marketing.
Integrations you can build workflows around
Cavuno supplies several ways to connect the board to other software:
| Connection | What it provides | Example workflow |
|---|---|---|
| Zapier | Public Zapier app with OAuth, job and candidate triggers, supported actions, and searches | A CRM workflow creates a company and draft job; a published-job event starts a social workflow |
| n8n | Verified Cavuno community node for Cloud or self-hosted n8n, with scoped API credentials and webhook triggers | Find a company, create a draft job, and process later publication events |
| MCP | Hosted server through which compatible AI clients discover and call the Cavuno API | Ask an agent to inspect listings and prepare supported updates using your authorized access |
| REST API and webhooks | Direct access for custom integrations and signed outbound events | Connect an internal tool and monitor delivery failures |
These are different interfaces to the job board system. Zapier and n8n run repeatable workflows; MCP lets an AI client work with supported board operations. Cursor or Codex can therefore be used with Cavuno as well as to build a board from scratch.
External automation services have their own charges and limits. Cavuno access also depends on the plan, credentials, and permissions. Choose minimum necessary access where supported, test with fictional records, and review an agent's proposed changes before authorizing consequential actions. An integration cannot manufacture a candidate's marketing consent: Cavuno's Zapier and n8n interfaces support finding or withdrawing permission, not granting it on someone else's behalf.
The AI builder has a job board system behind it
Cavuno's AI builder lets you create and customize your board with the platform's job board capabilities behind it. When comparing it with Lovable, Replit, Cursor, and similar tools, look beyond the first design: try the employer and candidate journeys, then compare the features and operating responsibilities as the board grows.
Those tools can build capable applications, and their bundled infrastructure can be good value. A custom build can make sense when your workflows are unusual, you want to learn, or maintaining the software is part of the project you want to own. Cavuno can make sense when you want to shape the board while using established job board workflows and operations. If you prefer a custom frontend in code, also explore the Cavuno SDK and verify that its supported workflows fit your requirements.
Check current inclusions, capacity, and AI website builder credits on the pricing page. Compare a plan with the same workload and features as your DIY scenario, including applicable payment and domain costs.
The local reference does not validate Cavuno's entire feature set or establish a production operating cost. Confirm your billed price and plan inclusions when evaluating a plan.
A third route: use an agent with Cavuno's starter kit
You can own and customize the frontend code while using Cavuno for the job board backend. Our TanStack Start + shadcn/ui template uses the Cavuno SDK and includes agent instructions for working with the supported platform contracts.
Its documented sandbox includes candidate and employer personas, an applicant pipeline, captured test emails, and Stripe test-mode checkout. This lets you explore more of the product while shaping its design. Follow the repository's current requirements and setup guide; it uses a different stack from Climate Roles. Moving to your own live board involves Cavuno configuration and applicable platform/hosting costs.
Climate Roles is the independent test build used for this article. The Cavuno starter kit is the route to explore when you want a custom frontend with the platform's existing workflows behind it. We inspected its documentation for this comparison; the tutorial's test results apply to Climate Roles, not to a new test run of the starter kit.
Check ownership and your route out
With a repository-based custom build, you can keep and change the application source, subject to its dependency and asset licenses. That is a meaningful advantage. Moving it still requires work: Convex functions and data, Clerk identities, file storage, deployment configuration, and external integrations do not become portable merely because the frontend is in Git. For hosted builders, verify code export and backend dependencies separately.
Cavuno documents data exports for jobs, companies, candidate profiles, subscribers, and blog content, with employer-account export available through the API. Check the fields and permissions you need. Candidate resume links require authenticated access, and employer application records are not available through the board-operator export. A CSV export is not a copy of the hosted application or a complete disaster-recovery backup.
Before choosing either route, export a small fictional dataset, inspect its relationships and consent/status fields, and work out how you would import it elsewhere. Also keep control of your domain and document where files, credentials, and backups live. These are evaluation checks; we have not completed a Cavuno migration or production restore for this tutorial.
Choose based on the work you want to own
Choose a custom build when controlling the implementation is part of the value: you have unusual workflows, want to learn, or have someone responsible for maintaining the software. Keep checkpoints of your own build, test each extension, and budget for operating it.
Choose Cavuno when your main work is building the audience, attracting employers, and running the board, and its supported workflows fit your plans. Use the same journeys from this tutorial to evaluate it: submit a job, review it, find it through search and location pages, and check the candidate experience. Then examine the additional features and limits your niche needs.
Ready to focus on running your board? Start with Cavuno, then use the journeys in this guide to evaluate it for your niche. Prefer to keep designing in code? Explore the Cavuno starter kit.
If you are still comparing approaches, use our job board software buyer's guide and current plans with your expected job inventory, subscriber count, and required workflows.




![Cover Image for 6 ATS Platforms with Public Job Posting APIs [2026]](/_next/image?url=%2Fsite%2Fimages%2Fblog%2Fcovers%2F176390be-56d6-4bfd-9c0e-1d64eed62ba0.webp&w=3840&q=55&dpl=da5d8a611ce6ef99cbd02fb1d06e3cb78e08551d)